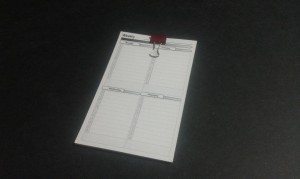
In 2004, back when PDAs like the PalmV were still popular, (Smart phones were still just for super-nerds.) a blogger named Merlin Mann got tired of his PDA, and decided he needed something simpler and easier to use. So he took a bunch of index cards, held them together with a binder-clip, and stuck them in his pocket. He called this the “Hipster PDA” because it was retro, and it replaced his PalmV. Now, I’m not sure if he was being serious, or just making a point, but the idea took off. Soon, people all across the world were extolling the virtues of this return to simplicity. Some people, craving the order and organization imposed by software, started designing templates that could be printed onto the cards to make this mass of index cards behave like it’s electronic forbears. There was only one problem : The Hipster PDA is pretty terrible to use.
As I see it, there are two problems with the Hipster PDA :
- The binder clip is horrible. Absolutely not the right tool for the job.
It’s a pain to open, it’s got those little handles that have to be flipped up and then flipped back down. - It’s difficult to write on a pile of loose cards.
Unlike a solid PDA which makes it’s own writing surface, the hipster PDA pretty much has to be put down on a table if you’re going to do anything other than horrible scribbles.
A Temporary Solution
My first step along the road to reinventing the Hipster PDA, was to dispense with that stupid clip. Instead I used a small “bullet” style miniature pen with a rather large clip that could hold a couple dozen cards itself.
This was better, because it got rid of that goofy clip so it solved #1, but it still didn’t do anything for #2.
I needed something better.
Designing the Next Generation
Based on a design I scribbled down on an index card, I decided to build something better. As luck would have it I’d been itching to try out the Ponoko laser-cutting service. If you’re not familiar with Ponoko, the basic idea is that you send them a design, and they will laser-cut it out of your choice of a wide variety of materials and mail it to you.
Here were my requirements :
- Hold a bunch of cards with no clip.
- Provide a soldid back-board so I can write without finding a table-top.
- Be “pocket-friendly”.
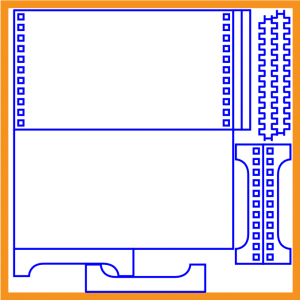
The “Cool” way to design laser-cut gadgets is to design them so that they slot together with no glue at all. So that’s what I did. As you can see, I’ve got a back-board with a row of holes, a pair of top pieces with matching holes, and a pair of connecting pieces with a zillion pegs on them.
After that, since I had some space left over. I made another one that had no holes, and could be simply held together with glue. I’m glad I did. More on that later.
One interesting aspect of laser-cutting services, is that in addition to the material cost, they charge you for the time it takes to cut the material. So it becomes a game or puzzle to draw all your pieces on the board with as few lines as possible. Notice how the spacers for the glue version is right up against the backboard for the slotted version. That’s not an accident, and I didn’t do it to be confusing. I laid it out like that so that I could share that edge. Looking back on it now, I see a few places where I could have eliminated a few more lines, but I think I did a pretty job of optimizing it.
It finally arrives!
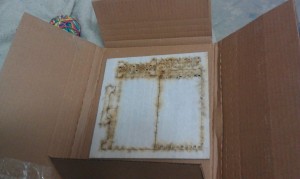 I was pretty excited about my first attempt at making something with laser-cut parts, so it seemed like it took forever to arrive in the mail. Actually it took about a week.
As you can see the sheets come with easily-removed sticky paper over the entire surface. I think this is done to create a consistant surface for the lasers to work on. Especially if you’d chosen a clear or reflective material.
In an instant I was at my work-bench poping pieces out like I was making a plastic model!
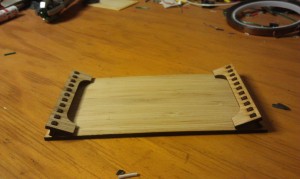
However, I hit a slight snag with the slotted-together version of my new invention.
Apparently … somehow … I miscalculated the size the holes should be. They’re about a third bigger than they should be. I must have had the wrong number for material thickness.
Luckily, I had also made the one that glues together. Previously I had thought of it as just something to fill up the unused space on the board, but now I was glad I’d done it.
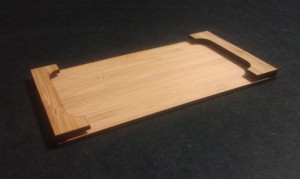
Basically it was a simple stacking construction. On either end of the base plate the little “space sticks” were glued, and then on top of them the no-hole overhangs were glued.
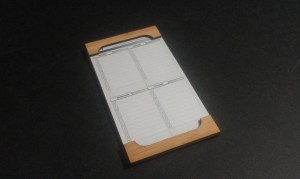
Success! I now have a lovely bamboo card-holder that holds my index cards.
It works quite well, and it fulfills my requirements. Those overhangs are not clips; they’re just lips that hold the cards by friction. It allows me to write easily without putting the cards down on a surface. And it’s quite comfortable in my pocket. The nice thing about bamboo is that it’s very light, despite having a good amount of strength.
Thoughts on the next version
As much as I like the result, it wouldn’t be a proper project if it didn’t get me thinking about the next one! Here are some things I’m thinking about for the next version :
- My original idea had a place to clip a SpacePen, this concept was scrapped, but I think a tiny loop of cloth or ribbon along the top would be sufficient.
- The overhang covers the corners of the card. This is no big deal with standard cards, but many of the PDA ‘templates’ available put a title in the upper left corner. (Like a ‘real’ PDA might.)
Perhaps it would still work fine with a smaller over-hang. - Because the cards are held in place by friction, there’s a minimum number of cards that must be carried. And because the gap between the back and the overhangs is pretty small, there’s also a maximum number of cards that can be carried. The sweet-spot seems to be about a dozen cards, which may be too few for some people.
- Bamboo is cool and very elegant, but I wonder if this wouldn’t also be cool in acrylic.
Has anyone else made something along these lines? I couldn’t find anything on Google, but I’d love to hear about it.
If anyone want’s to recreate this, my SVG file is here, But remember to adjust the holes to match the width of the material you use!
